19: The Duplex Escapement
All the drawings thus far have not included the action of the balance wheel, in order
to simplify the drawings and the simulations. Including it complicates
everything, but this is certainly necessary in this drawing.
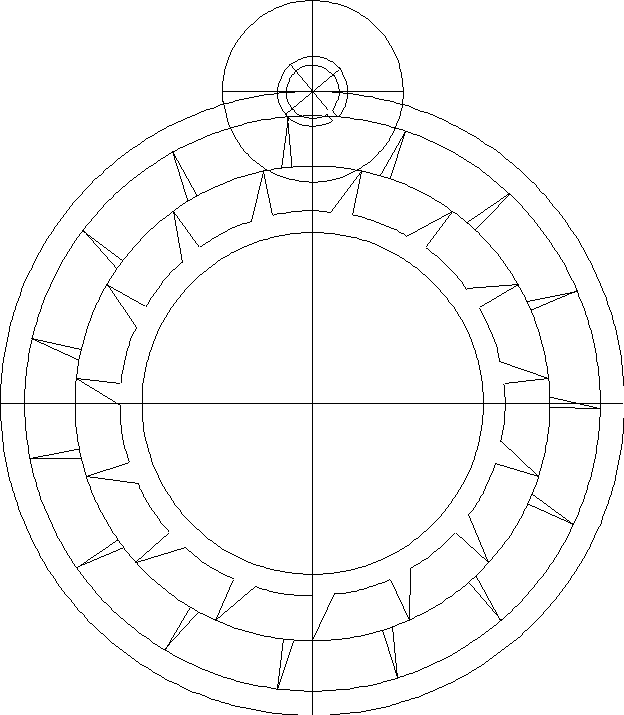
This escapement should be thought of as having two escape wheels, hence its
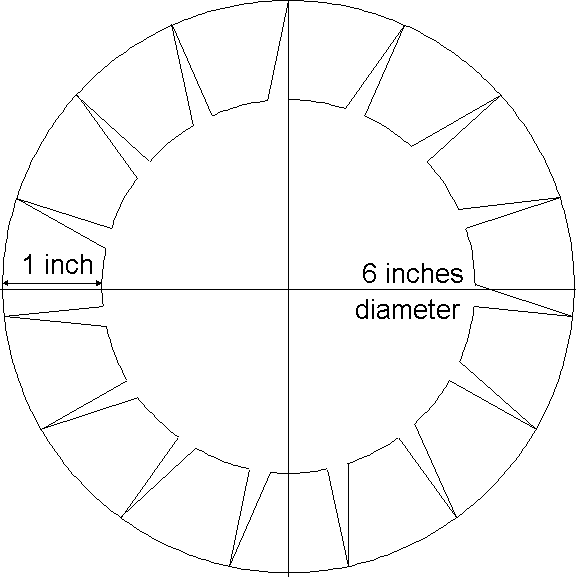
name. Draw the first escape wheel in a six inch diameter circle, each tooth having a
perpendicular locking face and a height of one inch. This escape wheel has 15 teeth,
so there are 24ş between each tooth.
 |
The inner escape wheel has smaller teeth, but they are similar and also have
perpendicular locking faces. Draw it in a 4.95 inch diameter circle, each tooth having a
height of a third of an inch. Both escape wheels need to be designed so that they could be
rotated either together or independently.
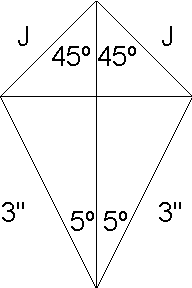
The difficult part is calculating the relationships of the variables: how far from the escape circle center the locking jewel's circle center needs to be, and the diameter of the
latter. If the locking span were taken to be 10ş, and the locking jewel's circle center were
placed on a circle 3.25 inches away from the escape circle center, its diameter could be
calculated.
 |
The radius of the locking jewel would be:
3 sin 5 = J sin 45
J = 3 sin 5 / sin 45 = 0.370"
if the locking jewel rotated 90ş during lock. Draw a circle with a radius of 0.37 inches, and draw a jewel in it as you wish.
 |
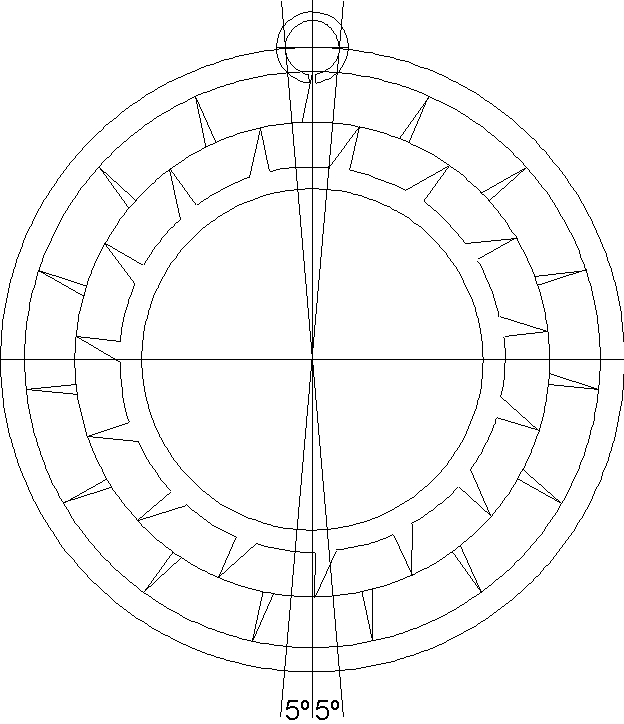
Since the angle between two escape teeth is 24ş, rotate one escape wheel by 12ş
so that, when combined, the inner teeth would appear to be half way between each
pair of outer teeth. Place the two escape wheels together inside a larger circle with a radius of 3.25 inches. Place the locking jewel such that its center lies on the circumference of the larger circle. Notice that the escape wheel rotates by 10ş during lock.
 |
 |
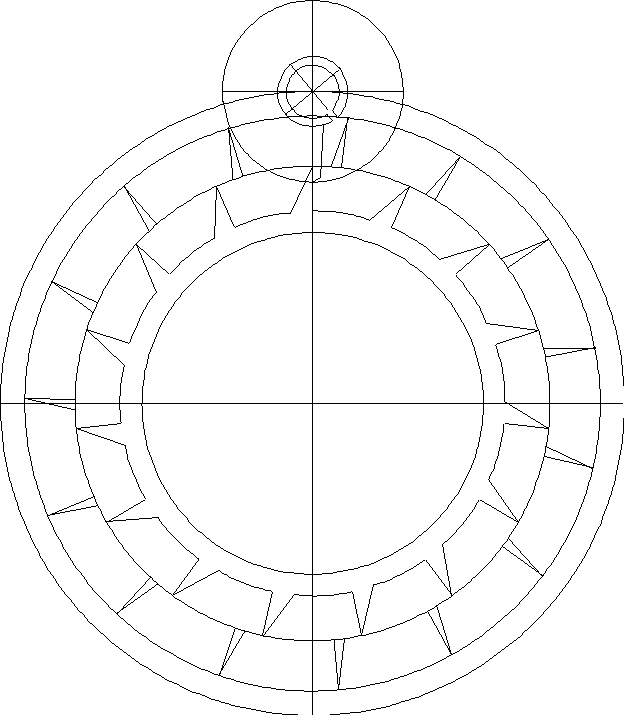
The impulse arm's length could be found by trial and error, or it could be calculated.
In this example, the impulse arm rotates by 60ş during impulse. The escape wheel rotates
by 24ş, less 2ş for drop, or 22ş. The impulse arm's circle radius will be given by 'X', and
the inner escape wheel's circle radius by 'W'.
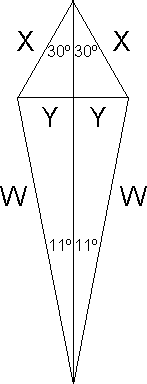 |
Y / X = sin 30 = 0.5
Y / W = sin 11 = 0.191
so, 0.5 X = 0.191 W
X = 0.382 W
X cos 30 + W cos 11 = 3.25
W = 2.476
2W = escape circle diameter = 4.952"
X = 0.382 x 2.476 = 0.946
(and 2X = impulse arm's circle diameter = 1.892 inches)
Draw the impulse arm's circle with two lines to indicate its center and with a
diameter of 1.89 inches. Place it such that its center lies on the center of the locking
jewel. Rotate the outer escape wheel clockwise until a tooth touches the locking jewel.
Then rotate the inner escape wheel until the impulse arm's circle becomes centered
between two inner escape teeth. Group the two escape wheels so that they would rotate
as one.
 |
Rotate the escape wheel clockwise by 12ş: in other words, 2ş after the tooth has been
released by the locking jewel. Rotate the locking jewel until it is at the point where it has
just released the escape wheel's tooth. Then draw the impulse arm next to the inner
escape wheel's tooth in its path.
 |
By analyzing the drawing, you would find that the escape wheel provides a
considerable impulse during the locking phase, not only during the impulse
phase.
In this example, I chose that the locking jewel would rotate by 90ş during lock and
the escape wheel by 10ş, and that the impulse arm would rotate by 60ş during impulse
and the escape wheel by 22ş. Try using different angles to determine what effect such
changes would have on the sizes of the locking jewel, the impulse arm, and the inner
escape wheel.
Go to Table of Contents
Go to Escapements